Getting started with Docker
In this tutorial you’ll learn:
- How to run containers.
- How to define and build images.
- How to create and use volumes.
- How to define and use networks.
Prerequisites:
- Having installed Docker on your computer or having imported the Linux virtual machine either with VirtualBox or with Multipass.
Related course material:
Slides of the first lecture. You can find them on Edunao.
Handbook (poly) of the first lecture. You can find it on Edunao.
Using a virtual machine with Multipass? Click here for more info
Multipass commands
To start the virtual machine, type
multipass start cloudvm.The folder
/home/ubuntu/labsin the virtual machine is mounted (i.e., linked) to the folder on YOUR computer (let’s call itLAB) where you’ll store all your lab material. You specified this folder when you installed the virtual machine.If you don’t remember the path to the folder linked to
/home/ubuntu/labs, type the commandmultipass info cloudvm.To open a terminal into the virtual machine, type
multipass shell cloudvm.When the terminal opens, the current working directory is
/home/ubuntu.Type
cd labsto move to the folder where you’ll find your lab material.You’ll use the virtual machine terminal only to type the Docker commands. You can use all the tools installed on your machine to create and manage the files in the directory
LABdirectly from your computer.Once the lab is over, type
exitto leave the virtual machine terminal. This will lead you back to the terminal of your computer.In the terminal of your computer, type
multipass stop cloudvmto stop the virtual machine. This will NOT destroy your files! It just stops the virtual machine from needlessly using the resources of your computer.
Terminology
You’ll use the terminal to run Docker commands. The terminal is the client that communicates with the Docker daemon.
Docker runs containers on your computer. We’ll refer to your computer as the host, the containers being the guests.
- A containerized application is an application running in a container.
1 Running containers
We now learn how to use the command docker run and some of
its options.
In the following exercises, we’ll run containers from the image named
alpine that is
available on the DockerHub registry.
This image provides a lightweight distribution
(i.e., it doesn’t contain many features) of Linux.
Exercise
Exercise
Exercise
/bin/sh),
can you tell why the container stopped without giving any output?
We’re now going to do something useful with the image alpine. Make sure you read the good practices that you should adopt while playing with images and containers.
Good practices
- Name your containers. Although Docker assigns a default name to a new container,
it’s usually a good practice to give a container a name of your
choice to make it easily distinguishable. You can do it by using the option
--name. Try the following:
docker run --name my-alpine alpine
As before, the container stops immediately. If you list all your containers by typing again:
docker container ls -a
you should see a container named my-alpine.
- Remove automatically a container if you use it once.
Unless you want to reuse your container later, you can ask Docker to automatically remove it
when it stops by using the option
--rm. This will prevent unused containers from taking up too much disk space.
Try the following:
docker run --rm --name container-to-remove alpine
If you list all the containers you should see that there is no container named container-to-remove.
- Remove unused containers. Stopped containers that have been run without
using the option
--rmare still stored in the host. If you want to remove a specific container (e.g., my-alpine), use the following command:
docker container rm my-alpine
If you want to remove all stopped containers, use the following command:
docker container prune
- Remove unused images. Images can take up a lot of disk space.
As a result, you should remember to remove those that you don’t intend to use
any longer.
The commands to remove a specific image
and prune unused ones are
docker image rmanddocker image prune -arespectively.
1.1 Pass a command to the containerized application
Remember that the template of docker run is the following:
docker run [options] image-name [command] [arg]
The optional parameter command refers to a command that you can pass the containerized application, possibly with some arguments (parameter arg).
Let’s see an example.
As we saw before, when we run a container from the image alpine,
a Linux terminal /bin/sh is launched.
Notice
The Linux terminal /bin/sh is run within the
container.
Henceforth, we’ll use the following terms:
- Host terminal. The terminal that you use to interact with the operating system of your computer.
- Guest terminal. The terminal that is run within the container.
By using the optional parameter command, we can run a command in the guest terminal.
Exercise
Exercise 1.4
Run a container from the image alpine and execute the
Linux command ls that lists the content of the current directory.
- Where are the listed files stored? In the host or in the container?
Notice
In Exercise 1.4 the command
ls is executed in the guest terminal, but its
output is redirected to the host terminal.
In other words, when we run the container, we don’t interact directly with the guest terminal; we just send a command and the output is redirected to the host terminal.
Now let’s see how to execute a command in the guest terminal that also requires an argument.
Exercise
ping, check
whether the Web site www.centralesupelec.fr is reachable.
Now run the following command:
docker run --name my-alpine -it alpine
Note: we didn’t use the option --rm (the container will not be removed
when we stop it, we’re going to use it again).
Moreover, we didn’t specify any command to run in the guest terminal.
Exercise
1.2 Starting and stopping containers.
docker run is a shorthand for two Docker commands, namely
docker create, that creates a container from an image,
and docker start, that starts the container after its creation.
Suppose now that you want to download a Web page
by using Linux Alpine.
You can use the Linux command wget followed by the URL of the page
that you want to download.
Exercise
Exercise 1.7 By using the guest terminal in the container my-alpine, download this Web page.
- Where will the Web page be saved? The host computer or the container?
Want to copy the donwloaded file from the container to your computer?
To copy the file presentation to your working directory, type the following command in
the host terminal:
docker cp <containerId>:/presentation .In the previous command, replace <containerId> with the identifier of your container. You can obtain
the identifier of the container from the output of the command docker container ls -a.
Where are the containers and image files stored?
If you use MacOS or Windows
The files managed by Docker are not stored directly in your computer, but in the Linux virtual machine installed and operated by Docker Desktop (remember, Docker always need Linux to be executed).
Therefore, you need to open a terminal inside that Linux virtual machine by typing the following command:
docker run -it --rm --privileged --pid=host justincormack/nsenter1Once the terminal is opened, you can follow the instructions given below for Linux users.
If you use Docker on Linux
All files managed by Docker are stored under folder
/var/lib/docker.To access that folder, you need to be root (i.e., administrator). Type the command
sudo su.If you type
ls /var/lib/dockeryou can look at the folders stored under this directory. You’ll see that there are folders corresponding to the different objects managed by Docker (containers, images, volumes and networks).To locate the files of a specific container, you first need to get the container identifier by typing
docker container ls -a.Type the command
docker inspect <container-id>(replace<container-id>with the identifier of the container that you intend to inspect).Locate the field
UpperDir. The value of this field is the path to the directory (let’s call itCONTAINER_DIR) that contains the upper layer of the container (the writable layer). It should be a path that ends by/diff.If you type
cd CONTAINER_DIR(replaceCONTAINER_DIRwith the value of the fieldUpperDir) you can finally see the files stored in your container.
In my-alpine guest terminal type exit.
This closes the guest terminal and, as a result, stops the
container.
NOTICE
Stopping the container will not erase any of the files stored in the container. Removing the container will.
If you want to start the container my-alpine again, you can use the following command:
docker container start -ai my-alpine
This will open the guest terminal of the container again;
type ls to verify that
the Web page that you downloaded before is still there.
Homework (optional)
Suppose that you need to download all the figures of
this Web page.
The Linux utility wget comes in handy.
However, you don’t have Linux and you’d like to
avoid the hassle of installing it on your computer, or in a virtual machine,
just for this task.
A great alternative is to run Linux in a Docker container.
Unfortunately, the Alpine distribution that we’ve been playing
with doesn’t provide
an implementation of wget with all the options that we need.
We turn to another Linux distribution, Ubuntu, for which DockerHub has several images.
Exercise
--rm, we’ll use this container later.
From now on, we’ll be interacting with the guest Ubuntu terminal.
If you type the command wget,
you’ll get an error (bash: wget: command not found).
Notice
The image Ubuntu doesn’t include all the commands that you’d find in a full-blown Ubuntu distribution; the reason is to keep the size of the image small, a necessary constraint given that images are transferred over the Internet.
Luckily, there’s a way to install wget in our Ubuntu distribution.
Ubuntu provides a powerful command-line package manager called
Advanced Package Tool (APT).
First, you need to run the following command:
apt update
which fetches the available packages from a list of sources
available in file /etc/apt/sources.list.
Then, you can install wget by running the following command:
apt install -y wget
In order to obtain all the figures from a Web page, type the following command:
wget -nd -H -p -P /my-figures -A jpg,jpeg,png,gif -e robots=off -w 0.5 https://www.centralesupelec.fr/fr/presentationYou should see in the current directory a new folder
named my-figures containing the downloaded figures;
verify it by typing ls my-figures.
Before terminating, don’t forget to read your fortune cookie. In the shell, run the following command:
apt-get install -y fortune
and then:
/usr/games/fortune -s
When you’re done, you can simply type the command exit to quit
the guest terminal and stop the container.
2 Creating Images
A Docker image can be thought of as a template to create and run a container. An image is a file that contains a layered filesystem with each layer being immutable; this means that the files that belong to a layer cannot be modified or deleted, nor can files be added to a layer.
When a container is created from an image, it will be composed of all the image read-only layers and, on top of them, a writable layer (termed the container layer), where all the new files created in the container will be written. For example, the Web page that you downloaded in Exercise 1.7 were stored in the writable layer of that container.
2.1 Dockerfiles
The most common way to create an image is to use a Dockerfile, a text file that contains all the instructions necessary to build the image. The advantage of the Dockerfile is that it can be interpreted by the Docker engine, which makes the creation of images an automated and repeatable task.
Suppose that we want to create a containerized application to download figures from a Web page. As a template for this application, we need to build a new image, that we’ll call fig-downloader.
The Dockerfile containing the instructions to build the image fig-downloader is as follows:
FROM ubuntu
RUN apt-get update
RUN apt-get install -y wget
RUN mkdir -p /my-figures
WORKDIR /my-figures
ENTRYPOINT ["wget", "-nd", "-r", "-A", "jpg,jpeg,bmp,png,gif"]
CMD ["https://www.centralesupelec.fr/fr/presentation"]
Here’s the explanation:
We use the image ubuntu as the base image. This corresponds to the instruction
FROM ubuntu.We install the utility
wgetin the base image. This corresponds to the instructionsRUN apt-get updateandRUN apt-get install -y wget.We create a directory
my-figuresunder the root directory of the image. This corresponds to the instructionRUN mkdir -p /my-figures.We set the newly created directory /my-figures as the working directory of the image. This corresponds to the instruction
WORKDIR /my-figures.We specify the command to be executed when a container is run from this image. This corresponds to the instruction
ENTRYPOINT ["wget", "-nd", "-r", "-A", "jpg,jpeg,bmp,png,gif"]
This instruction means: execute wget with the options
-nd, -r, -A;
the last option takes a list of file
extensions (jpg,jpeg,bmp,png,gif) as its argument.
- Remember that the utility
wgettakes the URL of the Web page as an argument. The URL will be specified when we run the container from the image fig-downloader. Optionally, we can specify a default argument by using the keyword CMD. The meaning of the instruction:
CMD ["https://www.centralesupelec.fr/fr/presentation"]
is: if we don’t give any URL when we run the container, the figures will be downloaded from https://www.centralesupelec.fr/fr/presentation.
Exercise
Exercise
2.2 Building an image
We’re now going to build an image from a Dockerfile.
Create a directory named fig-downloader in your computer with a file named Dockerfile inside.
In the Dockerfile write the set of instructions that you proposed in Exercise 2.2.
In the terminal, set the working directory to fig-downloader.
Build an image called fig-downloader by executing the following command:
docker build -t fig-downloader .
The . at the end of the command means that the Docker engine will
look for a file named Dockerfile in the working directory.
Good to know
If you give the Dockerfile a different name (say, Dockerfile-fig-downloader), the command to build the image will be:
docker build -t fig-downloader -f Dockerfile-fig-downloader .
The option -f is used to specify the name of the Dockerfile.
In order to verify that the new image has been created, type the following command:
docker images
Exercise
Exercise 2.3 Run the following command:
docker run --name dl-1 fig-downloader
Exercise
Exercise 2.4 Run the following command:
docker run --name dl-2 fig-downloader https://www.centralesupelec.fr/2.3 Containerized Python application
Download this archive file and unzip it into your working directory. In this archive you’ll find:
- A Dockerfile.
- A Python script main.py that asks the user to enter the URL and the language of a Web page, and prints the 10 most frequent words occurring in that page.
- A file requirements.txt with the list of the Python packages needed to run the given script.
The content of the Dockerfile is as follows:
FROM python:3.7-slim
RUN mkdir -p /app
WORKDIR /app
COPY ./main.py ./requirements.txt /app/
RUN pip install -r requirements.txt
ENTRYPOINT ["python", "main.py"]
Exercise
Exercise
Exercise
Exercise
Exercise
Exercise
Play with the application by running the following command:
docker run --rm -it wordfreq
The containerized application will prompt you to insert the URL of a webpage and the language of the page (in English). The output will be the 20 most used words in the webpage.
3 Data Volumes
In Exercise 2.3 you’ve been asked to run a container named dl-1 to download some figures from a Web page. The figures were downloaded into the directory /my-figures of the container. But we left a question unanswered.
How do we transfer those figures from the container to the host computer?
The solution is to use volumes.
3.1 Docker volumes
A volume can be seen as a virtual storage device attached to a container. All files there are written to a volume survive the containerized application that created them. In other words, when a container is destroyed, all the files created by the application in the container remain in the volume.
Let’s create a new Docker volume called data-volume:
docker volume create data-volume
Good to know (advanced notion)
Where the data will be actually stored?
You can inspect the new volume by typing the following command:
docker volume inspect data-volume
A mount point is indicated; that’s the folder where the data will be actually stored. If your computer runs Linux, that folder will be available on the host; if your computer runs Windows or MacOS, you’ll not find that folder on your computer. Instead, it will be available in the virtual machine that Docker use on MacOS and Windows.
Do you want to see the directory? (Instructions for Windows and MacOS)
One way to look into the hidden VM is to run the following containerized application:
docker run -it --rm --privileged --pid=host justincormack/nsenter1
This application will open a guest terminal into the VM.
You can then use the commands cd and ls
to browse to the directory indicated as the mount path
of the new volume.
4 Single-Host Networking
In order to let containers communicate and, therefore, co-operate, Docker defines a simple networking model known as the container network model (figure 4.1).
If you use a Linux virtual machine with Multipass
In this section, you’ll need to open several terminals in the virtual machine.
You can do it easily by using byobu, an advanced window manager already available in your virtual machine.
Just type
byobuto launch the window manager.If you want to open a new terminal, just press F2.
If you want to switch from a terminal to another, just press F3 (to move to previous terminal) or F4 (to move to next terminal).
If you want to close a terminal, just type
exit.When you close all terminals,
byobuwill stop executing.
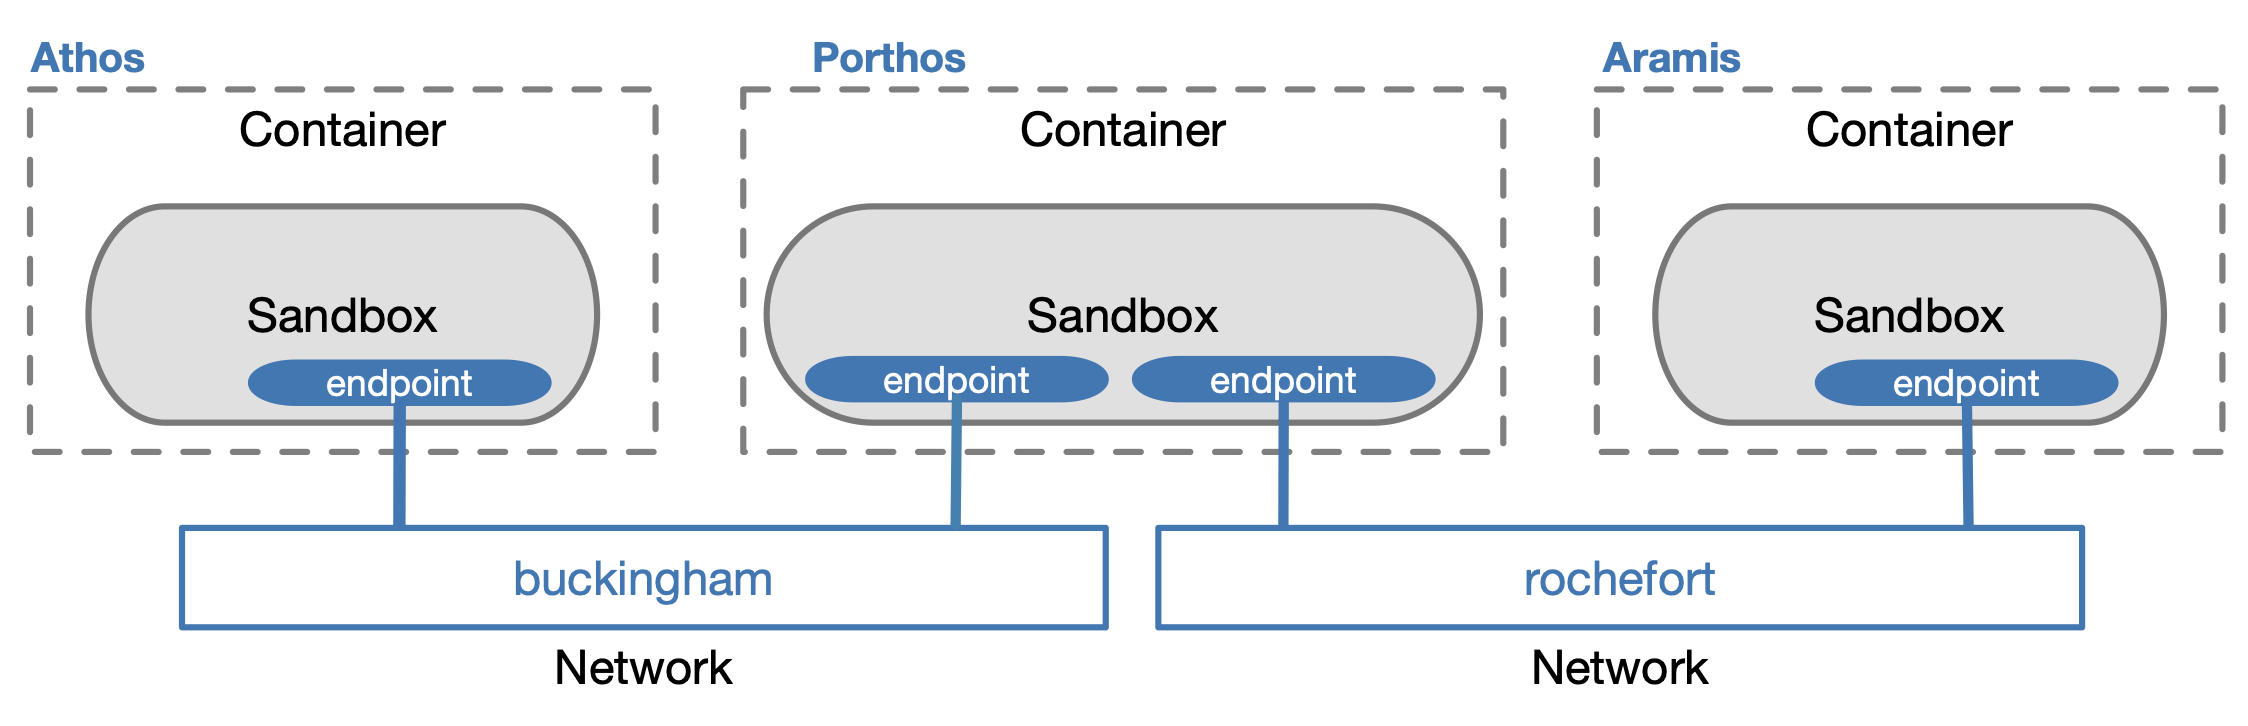
Figure 4.1: The Docker container network model
Exercise
Exercise 4.1 Describe the output of the following command:
docker network ls
Exercise
Exercise 4.2 The following command:
docker network inspect bridge
4.1 Creating networks
By default, any new container is attached to the network named bridge.
Exercise 4.3 Explain why it is not a good practice to attach all our containers to the same network.
In order to create a new network, you can use the following command:
docker network create network_name
Exercise
docker network inspect command,
look at the IP addresses of the new networks and write them down.
Exercise
Exercise 4.5 Create three containers athos, porthos and aramis and attach them to the two networks buckingham and rochefort as displayed in figure 4.1. The three containers will open a Linux Alpine shell. You’ll need to launch the commands in three separate tabs of your terminal window.
- What will the IP addresses of the three containers be in the two networks? Remember that porthos is attached to two networks, therefore it’ll have two network interfaces (endpoints) and, as a result, two IP addresses.
- Verify your answers by inspecting the two networks (use the
command
docker network inspect).
4.2 Communication between containers
Let’s see if and when the three containers can communicate.
Exercise
Exercise
Exercise 4.7 Try to ping porthos from athos by using its IP address.
- Which IP address of porthos would you use?
Exercise
You can now exit the three containers.