Introduction to Kubernetes
In this tutorial you’ll learn:
How to build and deploy a multi-service application with Docker Compose.
How to push an image to DockerHub.
How to deploy a multi-service application with Kubernetes.
Warning
This tutorial is adapted from the examples presented in Chapters 14 and 20 of the book G. Schenker, Learn Docker - Fundamentals of Docker 19.x (March 2020).
1 Docker Compose
In this section, you’re going to build and deploy a multi-service application by using Docker Compose.
Download this archive file and unzip it into a folder on your own computer. The archive contains all the necessary files to build and run a web application consisting of two services:
web. This is the frontend (the part the user interacts with) of the application. It consists of HTML and JavaScript code.
db. This is the backend (the part hidden to the user). It is a PostgreSQL (relational) database.
The structure of the application is shown in Figure 1.1.
The root directory of the application contains two subdirectories, one for each service
(database and web).
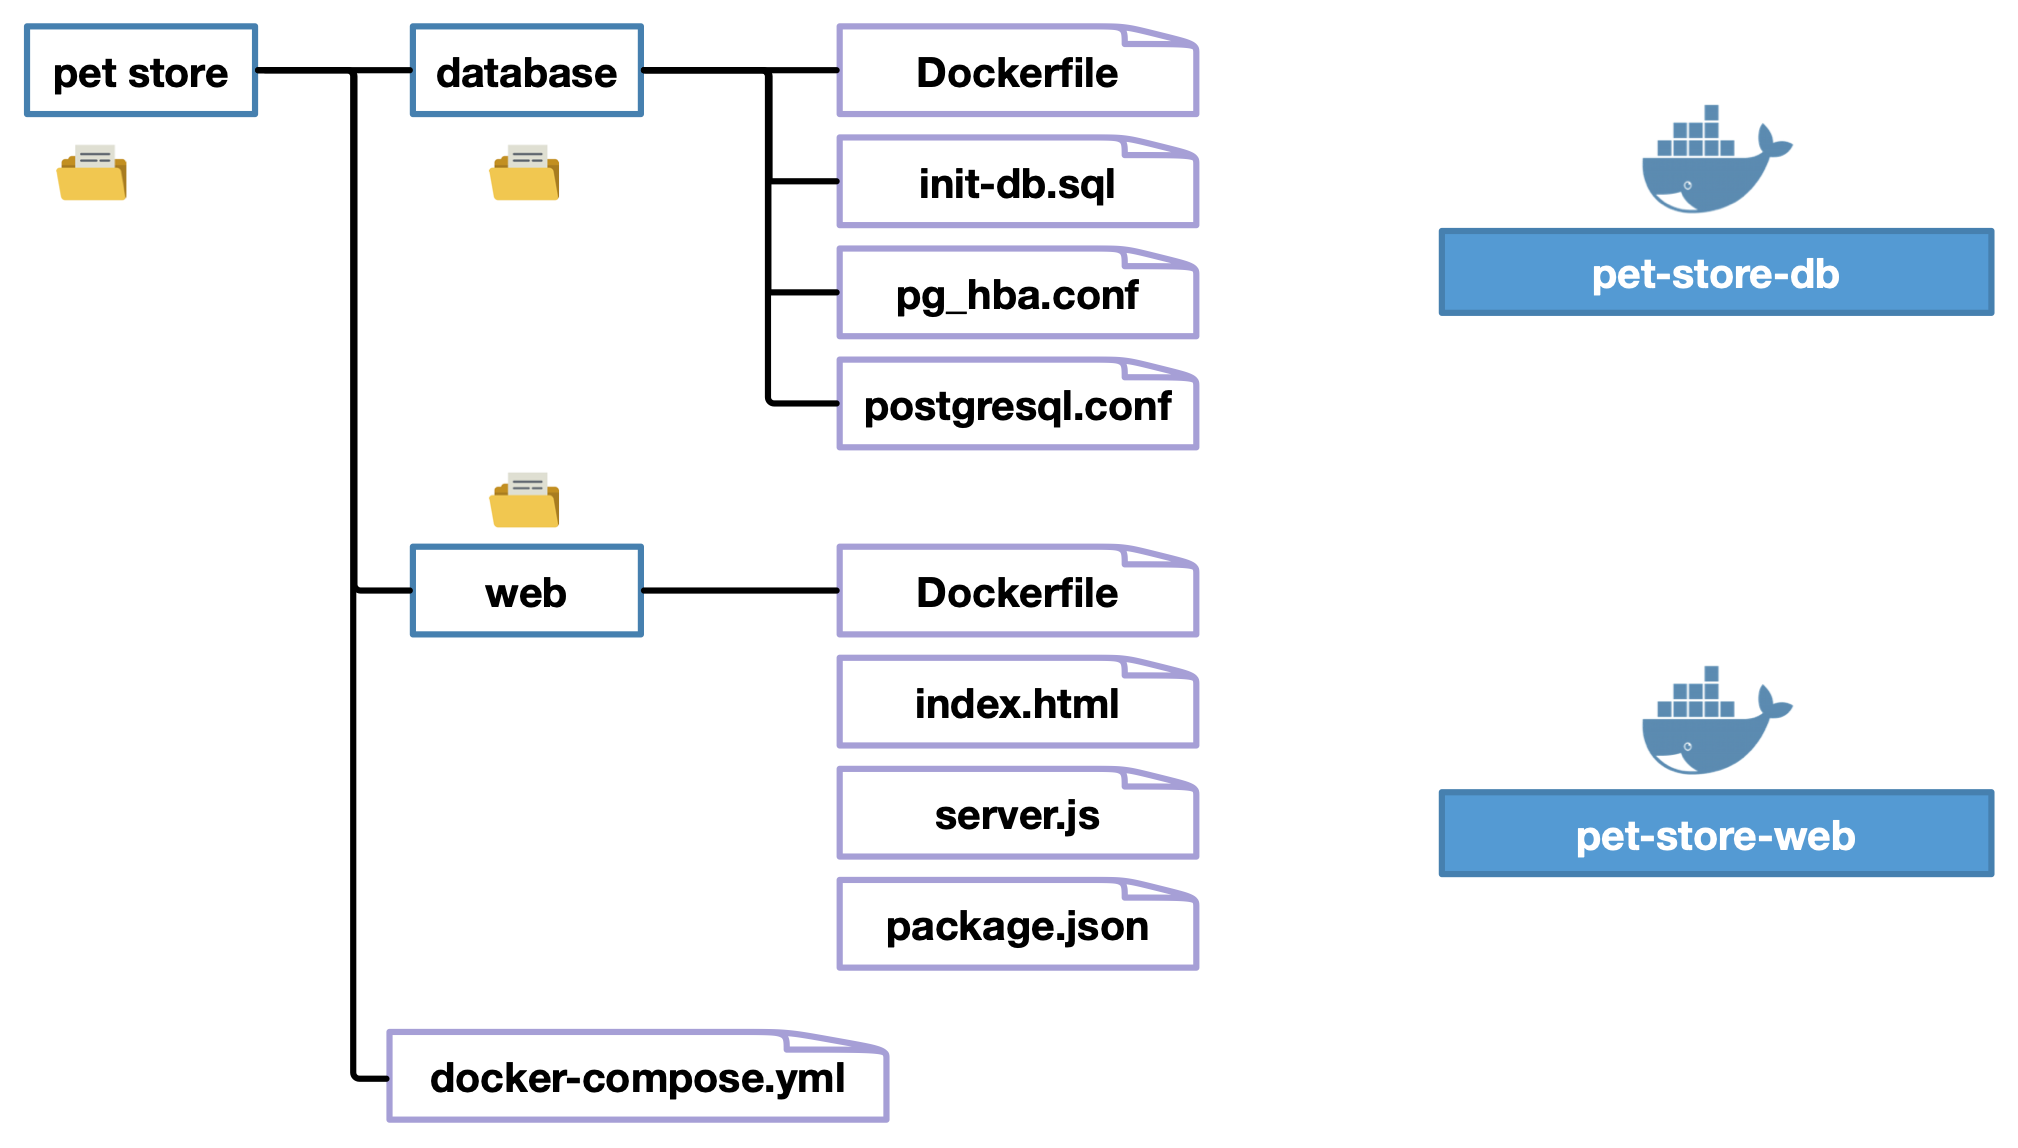
Figure 1.1: Structure of the application
Good to know
The files with extension
.confunder the directorydatabasecontain configuration parameters of the PostgreSQL database.The file
init-db.sqlunder the directorydatabasecontains the SQL queries to populate the database with some data (photos of cats).The directory
webcontains the HTML and JavaScript code of the web application. The filepackage.jsoncontains the dependencies to install.
Both directories contain a Dockerfile.
The one in directory database is as follows:
FROM postgres
COPY init-db.sql /docker-entrypoint-initdb.d/
RUN chown postgres:postgres /docker-entrypoint-initdb.d/*.sql
ENV POSTGRES_USER dockeruser
ENV POSTGRES_PASSWORD dockerpass
ENV POSTGRES_DB pets
The Dockerfile of the web application is as follows:
FROM node:9.6-alpine
RUN mkdir /app
WORKDIR /app
COPY package.json /app/
RUN npm install
COPY ./src /app/src
EXPOSE 3000
CMD node src/server.js
The Dockerfile builds on the image node:9.6-alpine that contains
a Node.js environment, a JavaScript-based platform for server-side
applications.
The instructions in the Dockerfile look like the ones of the examples
that we’ve seen in the first tutorial and in the lectures.
Good to know
The command
npm installinstalls all the dependencies specified in the filepackage.jsonfrom the software registry npm.The instruction
EXPOSE 3000informs that the container listens on port 3000 when it is executed from the image.
From the Docker documentation
we learn
that the “EXPOSE instruction
does not actually publish the port.
It functions as a type of
documentation between
the person who builds the image
and the person who runs the container, about which ports are intended to be published”.
In order to actually publish the port, we’ll use the file
docker-compose.yml.
1.1 Describing the application
The application showcases a building block of a pet store. In the current version, the application shows a few pictures of cats.
The root directory of the application contains a file named
docker-compose.yml that contains the declarative configuration
of the application.
The content of the file is as follows. It is a sequence of key-value pairs.
version: "3.6"
services:
  web:
    build: web
    image: pet-store-web
    networks:
      - backend
    ports:
      - 5000:3000
  db:
    build: database
    image: pet-store-db
    networks:
      - backend
    volumes:
      - pets-data:/var/lib/postgresql/data

networks:
  backend:

volumes:
  pets-data:
There are three main sections:
services. Defines the services of the application. Here two services are defined:webanddb.networks. Defines the networks used by the application. Here one network is defined:backend.volumes. Defines the volumes used by the application. Here one volume is defined:pets-data. The volume is attached to the directory/var/lib/postgresql/data(that is in the container).
Exercise
Exercise 1.1
What key informs docker compose where to find the
Dockerfile of the two services?
Solution
The value of the key build is the name of the directory that contains
the Dockefile. For the service web, this is the directory
web; for the service db, it is the directory database.
All paths are relative to the position of the file docker-compose.yml
itself.
When we’ll build the application from the file docker-compose.yml,
two images will be created, one for each service.
Exercise
Exercise 1.2
What will the name of the two images be?
What key in the file docker-compose.yml gives you this information?
Solution
The name of the image corresponding to the service web
will be pet-store-web.
The name of the image corresponding to the service db
will be pet-store-db.
This information is given by the key image
in the file docker-compose.yml.
1.2 Building the application
We now build the application.
Open the command-line terminal and by using the command
cdposition yourself in the root directorypet-storeof the application.Execute the following command:
docker-compose build
During the build you might get a
npmwarning. Just ignore it.When the build is complete, verify that the two images corresponding to the two services have been created (which docker command do you need here?).
Solution
docker images
1.3 Executing the application
We now execute the application with the following command:
docker-compose up
Warning
If your application fails to start because the port number that you chose is already in use, try using another port.
Don’t use the following ports as they are deemed unsafe by the browsers:
1, 7, 9, 11, 13, 15, 17, 19, 20, 21, 22, 23, 25, 37, 42, 43, 53, 69, 77, 79, 87, 95, 101, 102, 103, 104, 109, 110, 111, 113, 115, 117, 119, 123, 135, 137, 139, 143, 161, 179, 389, 427, 465, 512, 513, 514, 515, 526, 530, 531, 532, 540, 548, 554, 556, 563, 587, 601, 636, 993, 995, 1719, 1720, 1723, 2049, 3659, 4045, 5060, 5061, 6000, 6566, 6665, 6666, 6667, 6668, 6669, 6697, 10080
The execution of the command will print a series of messages on screen.
The terminal should hang when the messages stop
(the last message should be database system is ready to accept connections).
Take no action on the screen and open a new terminal or a new tab in the current terminal window.
Exercise
Exercise 1.3 Verify that the network and the volumes associated with the application have been correctly created.
Solution
Type the commands:
docker volume ls
and
docker network ls
to verify respectively that the volumes and the networks have been created
Exercise
Exercise 1.4 How many containers do you expect to be associated to the application?
Solution
Each image corresponds to a service. Here we have two. Each container corresponds to a service instance.
We didn’t specify any parameter when we launched the application, so by default one instance of each service is executed.
So, we expect to have two containers associated to the application:
one container for the service web and one for the
service db.
You can verify the answer to the previous question by typing the following command:
docker-compose ps
This command is exactly equivalent to docker container ls, except that
it only shows the containers associated with the application
that we’ve just executed.
Exercise
Exercise 1.5
In the output of the command docker-compose ps, can you explain
the meaning of the following?
0.0.0.0:5000->3000/tcp
Solution
The notation 5000->3000 means that the port 5000 of the host computer is mapped to the port 3000 of the container. More specifically, when a client application connects to the port 5000 of the host computer, the connection is redirected to the port 3000 of the container.
The IP address 0.0.0.0 means that we can connect to the container by using any IP address on the host computer.
Exercise
Exercise 1.6 Can you tell which URL you have to type in your web browser to access the application?
Solution
http://localhost:5000 or http://127.0.0.1:5000/.
In the network settings of you computer, you can also
get the IP address associated by the DHCP server of your
local network and use that address to connect to the application
from another device connected to the same network
(for instance, your mobile phone).
Warning
If you want to see the cats, you need to append
/pet to the URL that you found in the previous question.
This is determined in file server.js.
1.4 Shutting down the application
You can shut down the application by typing the following command:
docker-compose down
Exercise
Exercise 1.7 Does shutting down the application remove the networks created for the application? What about the volumes?
Solution
Just type the command:
docker network ls
and you’ll see that the network backend is not there anymore.
Type the command:
docker volume ls
and you’ll see that the volume pet-store_pets-data is still there.
By default volumes are not removed, to avoid the risk of permanently deleting data that might still be useful later. If you wish to remove the volumes when shutting down the application, you can type:
docker-compose down -v
1.5 Scaling a service
When we launch the application, we can specify the number of instances of each service. This is useful when we expect our application to be solicited by many users; the workload will be automatically balanced across all the instances of the service.
Let’s launch our application with 3 instances of the service web:
docker-compose up --scale web=3 -d
Exercise
Exercise 1.8 Running the previous command results in an error.
Can you explain why?
What fix would you propose in file
docker-compose.yml?
Solution
We’re trying to bind three instances to the port 5000 on the host computer. This is not possible.
In the section
portsof filedocker-compose.ymlwe need to remove 5000 and we only leave 3000. This way, each time we run a container, a random port will be chosen on the host computer to bind it with port 3000 of the container.
Warning
You need to shut down the application before relaunching it again.
In fact, even if we got an error, an instance of the db service and
an instance of the service web are still running.
Modify the file
docker-compose.ymland relaunch the application.Run the following command and verify that you actually have three running instances of the service
web.
docker-compose ps
- Try to connect to the application by using the three port numbers indicated in the output of the previous command.
Warning
Don’t forget to shut down the application before you go on.
2 Pushing an application
Once we have built an application, we might want to share it by pushing it to the DockerHub registry or any other container registry, be it private or public.
2.1 Creating an account on DockerHub
You need to create an account on the DockerHub website in order to perform this activity.
2.2 Renaming the images
In order to push your images to the registry, you need to rename them, so as the new name has the following structure:
yourusername/image-name:image-tag
For instance, since my username is quercinigia, I’ll rename
the two images pet-store-web and pet-store-db with the
docker tag command as follows:
docker tag pet-store-web quercinigia/pet-store-web:1.0
docker tag pet-store-db quercinigia/pet-store-db:1.0
I chosen 1.0 as a tag, but feel free to pick another one.
2.3 Logging in
You need to log in to your DockerHub account.
Instructions for Docker Desktop (macOS and Windows)
macOS users: to see how to log in click here.
Windows users: to see how to log in click here.
2.4 Pushing the images
Once you’re successfully logged in, you can type the following commands in the terminal to push the two images of your application:
docker push YOUR-USERNAME/pet-store-web:1.0
docker push YOUR-USERNAME/pet-store-db:1.0
Remember to replace YOUR-USERNAME with your actual username in the commands above.
After the task is completed, verify that the images appear in your Docker registry.
Good to know
Here we manually tagged and uploaded the two images. This method becomes quickly annoying when the application consists of more than two images. Another way to go about this task is:
- Specify the image names with your username in file docker-compose.yml. For instance, in my docker-compose.yml I would write:
services:
  web:
    build: web
    image: quercinigia/pet-store-web:1.0
  ...
  db:
    build: database
    image: quercinigia/pet-store-db:1.0
...- Build the application with the following command:
docker-compose build
- Push the images of the application with the following command:
docker-compose push
This way, with just two commands we push to the registry all the images of the application, no matter how many they are.
3 Introduction to Kubernetes
Kubernetes is the most popular orchestrator to date. It is used to manage a multi-service application, usually deployed across multiple hosts in a cluster.
While using Docker Compose, a service corresponds to a Docker image and a service instance to a Docker container.
As opposed to that, in Kubernetes the computation unit is a pod, that is a collection of containers. In other words, we don’t reason in terms of containers anymore, but in terms of pods. Of course, a pod can also consist of just one container.
Good to know
In practice, we rarely have to manipulate pods directly in Kubernetes, as there are higher-level objects that manage them. We’ll use these objects in the next sections.
3.1 Activate Kubernetes
Instructions for Docker Desktop (macOS and Windows)
You need to follow all the instructions documented on this page
Before moving on, don’t forget to type the following command to verify that Kubernetes is correctly activated
kubectl get nodes
You should see a node called docker-desktop whose status is set to READY.
If the status is NOT READY, just wait few seconds before typing the command again.
Warning
This solution might not be working for you. In that case, disable Kubernetes in Docker Desktop and install minikube, by following these instructions.
3.2 Deploying a pod
In order to deploy a pod, we first have to give its specification, basically its name and the containers that compose it with their settings. Similarly to Docker Compose, a pod is specified in a declarative way with a YAML configuration file.
Consider the following specification.
apiVersion: v1
kind: Pod
metadata:
  name: web-pod
  labels:
    app: web-pod
spec:
  containers:
  - name: web
    image: nginx:alpine
    ports:
    - containerPort: 80
Here is an explanation of the properties in the specification.
apiVersion. Defines the versioned schema of this representation.
kind. The type of the resource that we intend to create.
metadata. The resource metadata.
spec. The specification of the desired behaviour of the pod.
All these fields are described in the Kubernetes API reference.
Essentially, the previous specification defines a pod with a container that is launched from the
image nginx:alpine (a Web server) and listens to ports 80 and 443.
Activity
Copy the previous specification to a file named
sample-pod.yaml(or any other name of your liking).By using the command
cdin the terminal, place yourself in the directory where the filesample-pod.yamlis stored.Deploy the pod by typing the following command:
kubectl create -f sample-pod.yaml
- Verify that the pod is deployed by typing the following command:
kubectl get pods
The first time you run the last command, you might see that the pod is not
ready yet. You need to wait for the image nginx:alpine to be pulled from DockerHub.
Wait few seconds and try the command again until the pod is marked as running.
You can also get more information on the running pod (e.g., its assigned IP address) by typing the following command:
kubectl get pod -o wide web-pod
Exercise
Exercise 3.1
Open a web browser and type http://localhost:80.
What do you get? What if you try to use the IP of the pod instead of
locahost?What should we define in order to fix the problem?
Solution
The connection is refused both when using
localhostand the IP address of the pod.In order to connect to the service instance, we need to define a Service object in Kubernetes, that exposes an IP address that client applications can use.
The following configuration defines a Service object of type LoadBalancer:
apiVersion: v1
kind: Service
metadata:
  name: nginx-service
spec:
  type: LoadBalancer
  ports:
  - port: 8080
    targetPort: 80
    protocol: TCP
    name: http
  selector:
      app: web-pod
Good to know
A LoadBalancer service is a NodePort service that offers load balancing capabilities. It is intended to expose an IP address that client applications (external to the Kubernetes cluster) can use to access the service.
Exercise
Exercise 3.2
What is the field selector in the definition of the service?
Solution
The selector is used internally by Kubernetes to identify the pods that
are the instances of the service.
If you look at the specification of the pod above, the field metadata
contains a field labels.
One of the labels is app: web-pod ;
the selector matches this label.
Exercise
Exercise 3.3
In the specification of the service, what port and targetPort mean?
Solution
portspecifies the port number where the service will be available.targetPortspecifies the port number opened at the pods that are instances of the service.
Activity
Copy and paste the service specification into a file named
sample-service.yaml(or any other name of your liking).By using the command
cdin the terminal, place yourself in the directory where the filesample-service.yamlis stored.Deploy the service by typing the following command:
kubectl create -f sample-service.yaml
- Verify that the service is deployed by typing the following command:
kubectl get services
This command returns all services running in Kubernetes. For each service, you also get a name. In order to only target the service that you’ve just created, simply type the following command:
kubectl get svc/nginx-service
Your service’s name is nginx-service (as specified in file sample-service.yml);
svc is only the namespace where all Kubernetes services are
put.
Exercise
Exercise 3.4
By looking at the output of the command kubectl get svc/nginx-service,
which URL do you need to type in the Web browser in order to access the service?
Solution
The
CLUSTER-IPis an IP address that is only visible within the cluster. In other words, only the services running within the cluster can connect to ournginx-serviceby using this IP address.What we need to use is the IP address specified under
EXTERNAL-IP.
If you’re using Docker Desktop
EXTERNAL-IP is likely to be localhost
or 127.0.0.1
If you’re using Minikube
EXTERNAL-IP will be whatever IP address assigned to the service.
- As for the port number, under PORT(S) you should see something like 8080:30548 (the second number is likely different, but it should be something in the range [30000-32767]). The port 30548 is opened on each node of the Kubernetes cluster.
In practice, when we type http://localhost:8080, the load balancer replaces it
with the IP address of a node in the cluster,
followed by port number 30548.
When the kube-proxy on that node receives this request,
it forwards it to an instance of the service,
even if that instance runs in another node.
Warning
Stop the pod and the service before moving on. Here are the commands to do so:
kubectl delete po/web-pod
kubectl delete svc/nginx-service
4 Kubernetes: deploying an application
In this section, we’re going to deploy our pet store in Kubernetes.
As a reminder, our application consists of two services: web and db.
In order to define an application in Kubernetes, we need to use two types of objects for each service of the application:
A workload resource that gives the specification of the service, such as the pods that make up the service itself (images, network settings) and metadata, such as the desired number of instances.
A Service object. As we have seen previously, a service object exposes an IP address that allows client applications, both inside and outside the Kubernetes cluster, to connect to the service.
When we define an application in Kubernetes, we rarely, if ever, need to play directly with pods. Instead, we can resort to higher-level objects, called Controllers, for an easier definition of the desired state of the application itself. The type of the controller that we need to use depends on the nature of the service itself: stateless or stateful.
Exercise
Exercise 4.1
Is the service
webof our application stateless or stateful?Is the service
dbof our application stateless of stateful?
Solution
- Stateful service: one that manages permanent data and is bound to that data.
- Stateless service: one that is not bound to permanent data.
The service web is stateless because it does not have to be tightly bound to the data.
In other words, the service web uses the data that is stored in the backend database, but
it can be scheduled on any node of the cluster independently of that data.
The service db is stateful because it directly manages permanent data.
4.1 The web service: deployment
For stateless application services, we can use a Deployment for the deployment of a set of identical pods that are launched across several nodes in the Kubernetes cluster.
We here define the specification of
a Deployment corresponding to the service web.
apiVersion: apps/v1
kind: Deployment
metadata:
  name: web
spec:
  replicas: 3
  selector:
    matchLabels:
      app: pets
      service: web
  template:
    metadata:
      labels:
        app: pets
        service: web
    spec:
      containers:
      - image: quercinigia/pet-store-web:1.0
        name: web
        ports:
        - containerPort: 3000
          protocol: TCP
Here is the explanation of the specification:
A Deployment named
webis created, as indicated by the fieldmetadata.name.The Deployment creates three replicated pods, as indicated by the field
spec.replicas.The Deployment considers that the pods with both labels
app: petsandservice: webare part of the deployment. This is indicated by the fieldspec.selector.matchLabels. This field is used to let the Deployment know how to find its pods.The configuration of the pods that are part of the Deployment is given in the field
spec.templateand its subfields.Each pod of the Deployment is given labels
app: petsandservice: web. This is indicated by the fieldspec.template.metadata.labels. Note that here we specify exactly the same values as inspec.selector.matchLabels. This field is used to give pods labels so that they can be identified and located in Kubernetes.Each pod has exactly one container, named
web, run from the imagequercinigia/pet-store-web:1.0stored in the DockerHub. The container listens on port 3000 and uses the TCP protocol. This is specified in the fieldspec.template.spec.containers.
Activity
Copy and paste the previous specification to a new file
web-deployment.yaml(or any name of your liking). Make sure that you replace the imagequercinigia/pet-store-web:1.0with the one that you pushed to your DockerHub registry.Use the command
cdin the terminal to position yourself in the directory where the fileweb-deployment.yamlis stored.Deploy this Deployment in Kubernetes by typing the following command:
kubectl create -f web-deployment.yaml
Exercise
Exercise 4.2 Type the following command:
kubectl get all
Which objects have been created following the creation of the Deployment?
Solution
We can clearly see three types of objects:
Three pods, that correspond to the three replicas that we specified in the configuration.
One deployment. Note that the 3/3 indicates that the deployment has 3 identical pods, of which 3 are running.
One ReplicaSet. The Deployment creates a ReplicaSet, that is the actual object that controls the three pods. The Deployment provides some additional services (i.e., updates) on top of a ReplicaSet.
Exercise
Exercise 4.3 Get the name of one of the running pods and kill it by using the following command
kubectl delete name-of-pod
If the command hangs in the terminal, feel free to type Ctrl-C to get back control of the terminal.
Type again following command:
kubectl get all
How many pods do you see? Is it surprising?
Solution
If we type the command right after deleting the pod, it is likely that we’ll see four pods, one that is terminating and another one that is running. Try to type the command until you see three running pods.
This is not surprising. If we kill the pod, the orchestrator detects a deviation from the desired state (which is, we want three replicas) and reschedules immediately another pod. This is what we mean by a self-healing system. This is one of the major roles of an orchestrator.
4.2 The web service: service
Now we need to define a Service in order to expose the web service to the public. Here is the definition:
apiVersion: v1
kind: Service
metadata:
  name: web
spec:
  type: LoadBalancer
  ports:
  - port: 8080
    targetPort: 3000
    protocol: TCP
  selector:
    app: pets
    service: web
Exercise
Exercise 4.4 Describe the specification of this service.
Solution
We create a service named
web. This indicated in the fieldmetadata.name.The service has type
LoadBalancer. This is indicated in the fieldspec.type.The service listens on port 8080 and uses the TCP protocol. Each service instance (i.e., pod) listens on port 3000. This is indicated in the field
spec.ports.The instances of the service (i.e., the pods) are those with labels
app: petsandservice: web. This is indicated in the fieldspec.selector.
Activity
Copy and paste the previous specification to a new file
web-service.yaml(or any name of your liking).Use the command
cdin the terminal to position yourself in the directory where the fileweb-service.yamlis stored.Create the service with the following command:
kubectl create -f web-service.yaml
- Verify that the service has been created with the following command:
kubectl get services
- Locate the external IP (let’s call it EXTERNAL-IP) of the web service and type
the URL
http://EXTERNAL-IP:8080in your Web browser. You should see a Web page where the phrase Pet store appears.
4.3 The db service: StatefulSet
Kubernetes has defined a special type of ReplicaSet for stateful services that is called StatefulSet.
Let’s define a StatefulSet to give the specification of
the db service.
apiVersion: apps/v1
kind: StatefulSet
metadata:
  name: db
spec:
  selector:
    matchLabels:
      app: pets
      service: db
  serviceName: db
  template:
    metadata:
      labels:
        app: pets
        service: db
    spec:
      containers:
      - image: quercinigia/pet-store-db:1.0
        name: db
        ports:
        - containerPort: 5432
        volumeMounts:
        - mountPath: /var/lib/postgresql/data
          name: pets-data
  volumeClaimTemplates:
  - metadata:
      name: pets-data
    spec:
      accessModes:
      - ReadWriteOnce
      resources:
        requests:
          storage: 100Mi
By now you shouldn’t have any problem understanding the meaning of the fields
in this specification.
The field volumeClaimTemplates describes additional constraints on the volumes defined in the specification, in this case the volume
named pets-data (where PostgreSQL keeps the data). In particular, two claims are given:
The access mode
ReadWriteOncemeans that the volume can be mounted as read-write by a single node in the Kubernetes cluster. Access modes are documented here.We request at least 100MB of storage for the database.
Activity
Copy and paste the previous specification to a new file
db-stateful-set.yaml(or any name of your liking). Make sure that you replace the imagequercinigia/pet-store-db:1.0with the one that you pushed to your DockerHub registry.Use the command
cdin the terminal to position yourself in the directory where the filedb-stateful-set.yamlis stored.Deploy this StatefulSet in Kubernetes by typing the following command:
kubectl create -f db-stateful-set.yaml
Exercise
Exercise 4.5 Type the command:
kubectl get all
Which objects have been created when you deployed the StatefulSet?
Solution
A pod (likely to be called
pod/db-0)A new StatefulSet that governs the pod.
Note that the StatefulSet has only one pod, which is normal, since we didn’t specify a higher number of replicas.
Exercise
Exercise 4.6 Open the Web browser and type the following URL:
If you’re using Docker Desktop
http://localhost:8080/pet
If you’re using Minikube
http://minikube-ip:8080/pet
where you’ll replace minikube-ip with the external IP address associated with the
web service.
Right after, type the command kubectl get all.
What do you observe? Can you explain the reason?
Solution
We cannot access the application.
If you type the command kubectl get all quickly, you should show that the
three pods that are instances of the service web are in an error state.
If you were too slow, you should see that the restart count of each pod has changed.
This means that the pods have been restarted because of an error.
What happens here is that we launched the database, but we didn’t create the Service that lets the clients access the database.
In the output of the command get kubectl all, look at the names of the
pods that are instances of the web service.
Take the name of any these pods,
and put it in place of NAME-OF-POD in the following command:
kubectl logs NAME-OF-POD --previous
Exercise
Exercise 4.7 Does the output of the previous command confirm the explanation given in the previous question?
Solution
Yes, we can clearly read ENOTFOUND db db:5432.
This means that Kubernetes cannot resolve the name db to an IP address.
5 The db service: Service object
From the above observations, we understand that we need to define a service to expose the database to the clients.
Exercise
Exercise 5.1
Should the db service be accessible to client applications that are external to
the Kubernetes cluster?
Solution
No, this component is the backend of the application. The only client
that needs to access the database is the frontend, that is the
web service, that runs inside the cluster.
Exercise
Exercise 5.2 Given the answer to the previous question, what should the type of this service be?
Solution
ClusterIP; this is the type of a service that does not need to be exposed to the outside world.
Exercise
Exercise 5.3
Write the specification of the db service in a file
named db-service.yaml (or any other name of your liking).
Caution. In the file db-stateful-set.yaml the field spec.serviceName indicates the name
that the service must have.
Solution
apiVersion: v1
kind: Service
metadata:
  name: db
spec:
  type: ClusterIP
  ports:
  - port: 5432
    protocol: TCP
  selector:
    app: pets
    service: db
Activity
- Deploy the service by typing the following command:
kubectl create -f db-service.yaml
- Verify that the service has been created with the following command:
kubectl get all
- Verify that you can reach the application at
http://localhost:8080/pet(Minikube users: replacelocalhostwith the external IP address associated to thewebservice!). It might happen that the database service is not ready yet, and so you’ll get a connection error. Just wait and retry later.
5.1 Shutting down the application
After you’re done with the application, you can shut it down with the following commands:
kubectl delete svc/web
kubectl delete svc/db
kubectl delete deploy/web
kubectl delete statefulset/db
The order in which you type these commands doesn’t matter.
If you type multiple times the command:
kubectl get all
you should see that the resources progressively disappear.
5.2 Conclusion
In the previous exercises, we deployed an application with two services, for which we had to create
four files and type as many commands.
For larger applications this gets a bit annoying.
We can write all the definitions in a single file (e.g., pets.yaml)
where each specification is terminated by - - -.
Here is an example, where we write the specification of the
Service and Deployment associated with the service web.
apiVersion: v1
kind: Service
metadata:
  name: web
spec:
  type: LoadBalancer
  ports:
  - port: 8080
    targetPort: 3000
    protocol: TCP
  selector:
    app: pets
    service: web
---
apiVersion: apps/v1
kind: Deployment
metadata:
  name: web
spec:
  replicas: 3
  selector:
    matchLabels:
      app: pets
      service: web
  template:
    metadata:
      labels:
        app: pets
        service: web
    spec:
      containers:
      - image: quercinigia/pet-store-web:1.0
        name: web
        ports:
        - containerPort: 3000
          protocol: TCP